How to stack seventh arpeggios for full extensions
In this lesson, we’re going to explore a simple way of thinking about arpeggios that will help us build familiarity with the shapes and start using them confidently all over the fretboard.
How to turn an arpeggio into a riff
Let’s say you have a riff like this:
Fig. 1: Two-octave Dm7 arpeggio.
We could make it more interesting by adding a leading note to the start of the arpeggio.
Fig. 2: Two-octave Dm7 arpeggio with leading note.
But it’s still a simple arpeggio. Let’s turn it into more of a riff by playing it twice, but going up melodically at the end.
Fig. 3: Two-octave Dm7 arpeggio played twice with melodic variation.
This is starting to sound a lot cooler. Playing the same riff but giving it a different shape melodically at the end is a compositional idea I really like. Our ear is drawn to the variation because it directly contrasts the part of the riff that we’re hearing twice.
We could make it even more interesting by stacking an E minor seven arpeggio on top, rather than playing the D minor arpeggio twice.
Fig. 4: Em7 arpeggio stacked on top of Dm7 arpeggio variation.
This riff is based on the same idea melodically, we end on the same top note, and the first part of the arpeggio is the same. But it gives us a slightly different texture and leads more naturally into the E.
How to know which notes are in an arpeggio
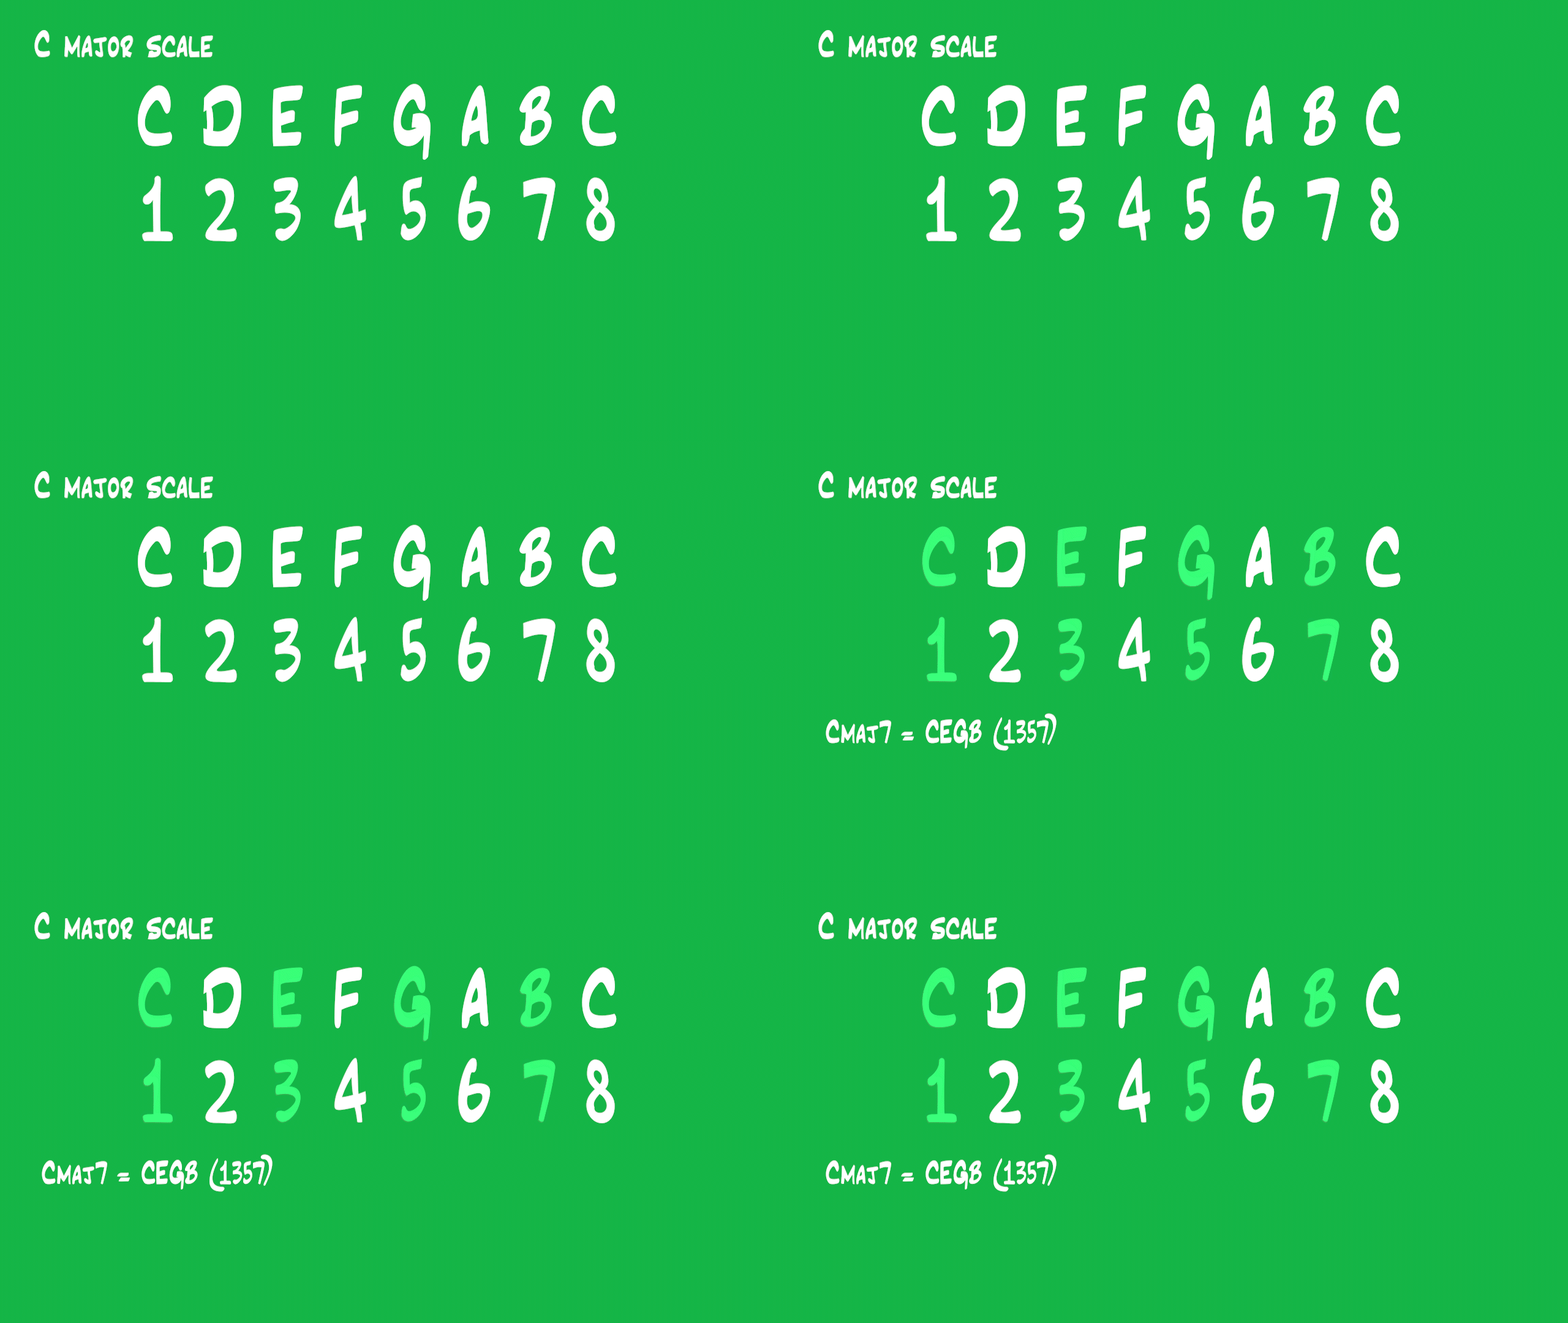
Chords are built by stacking thirds. Stacking three notes (two third intervals on top of each other) gives us a basic triad and stacking four notes (three third intervals on top of each other) gives us a seventh chord.
Fig. 5: Stacking thirds to form a seventh-type chord.
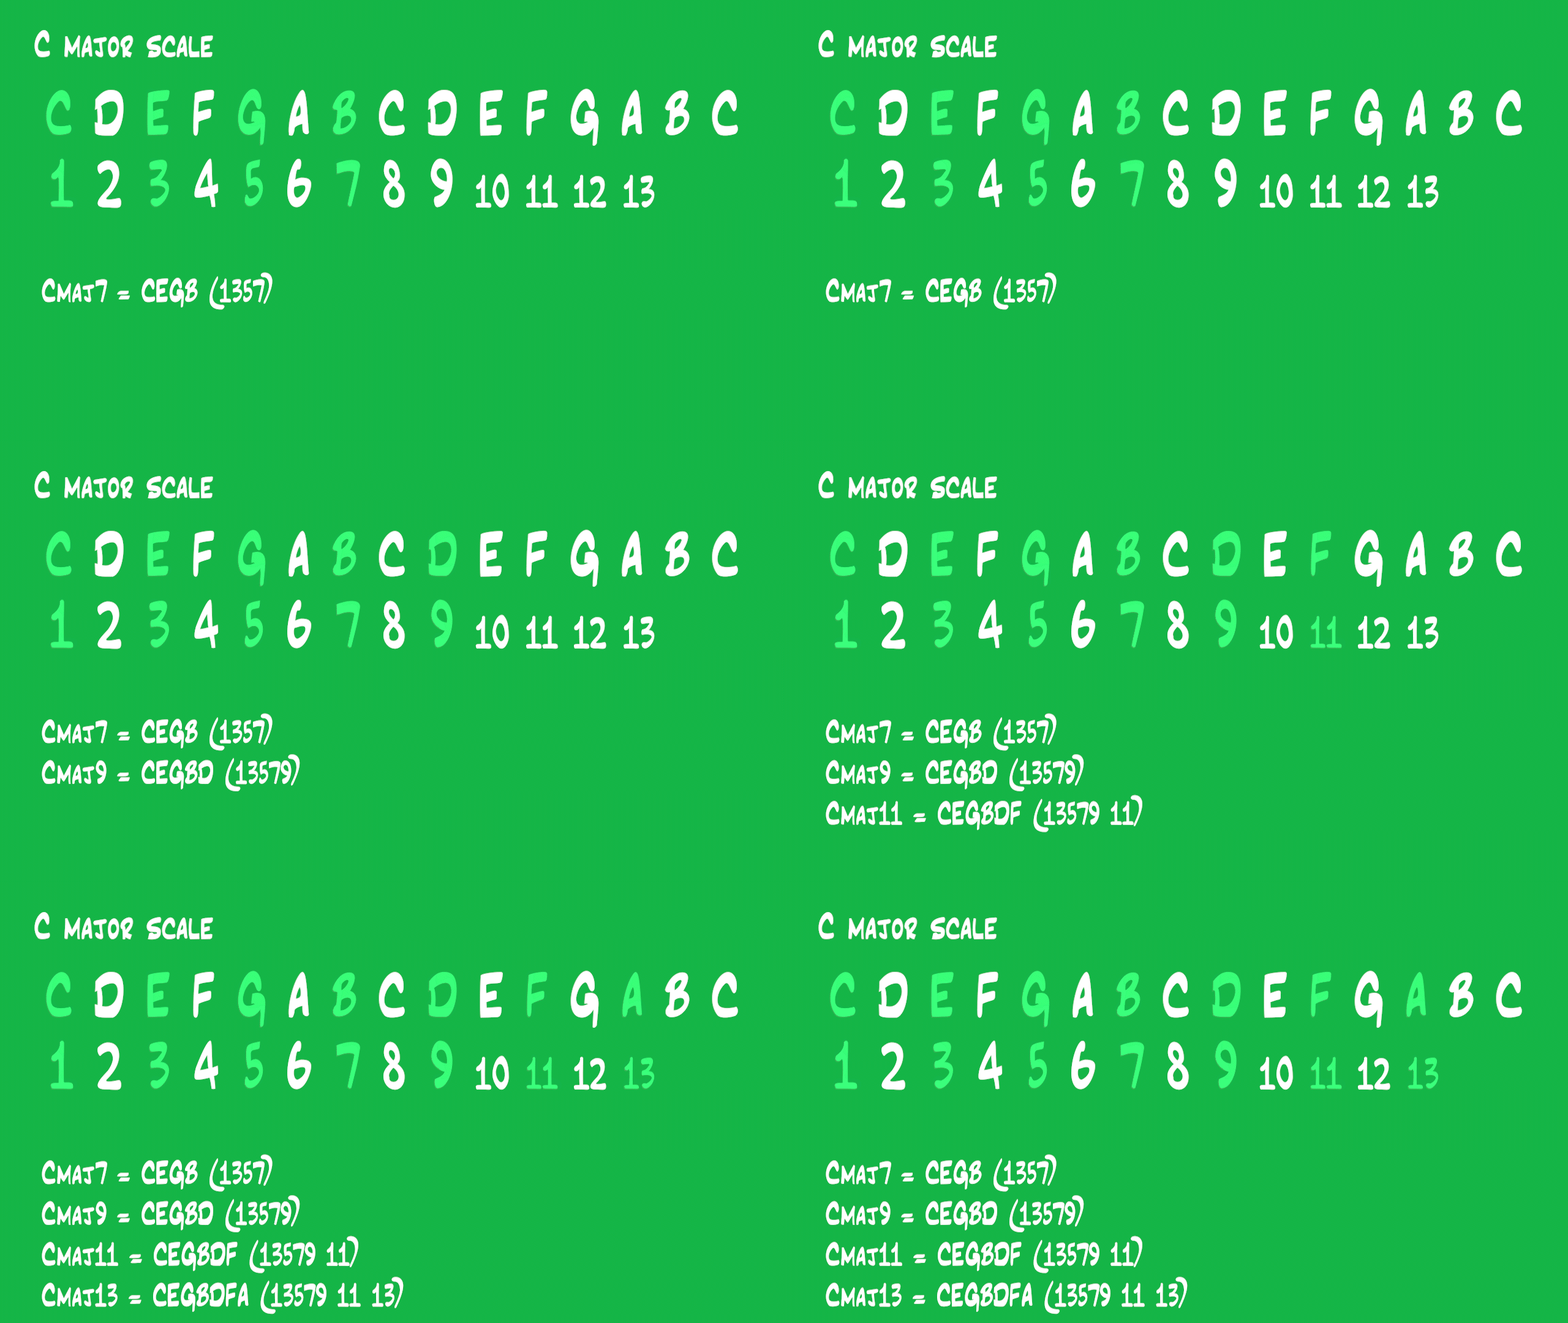
However, we don’t have to stop at the seventh chord. We can keep stacking thirds to get the 9th, 11th, and 13th scale degrees involved. At this point, we’re using all the notes in the scale.
Fig. 6: Stacking thirds to form a fully extended chord.
That’s a lot of notes involved in an arpeggio! It can be a pretty intimidating idea to think that we have to remember seven different seven-note arpeggio shapes just to be able to play all the chords in the key.
Thankfully, there is a simple trick we can use that only requires us to know the single octave shape for four seventh-type arpeggios.
That’s a lot less intimidating.
Do you remember how we got the 9th, 11th, and 13th scale degrees by continuing to stack thirds as far as we could?
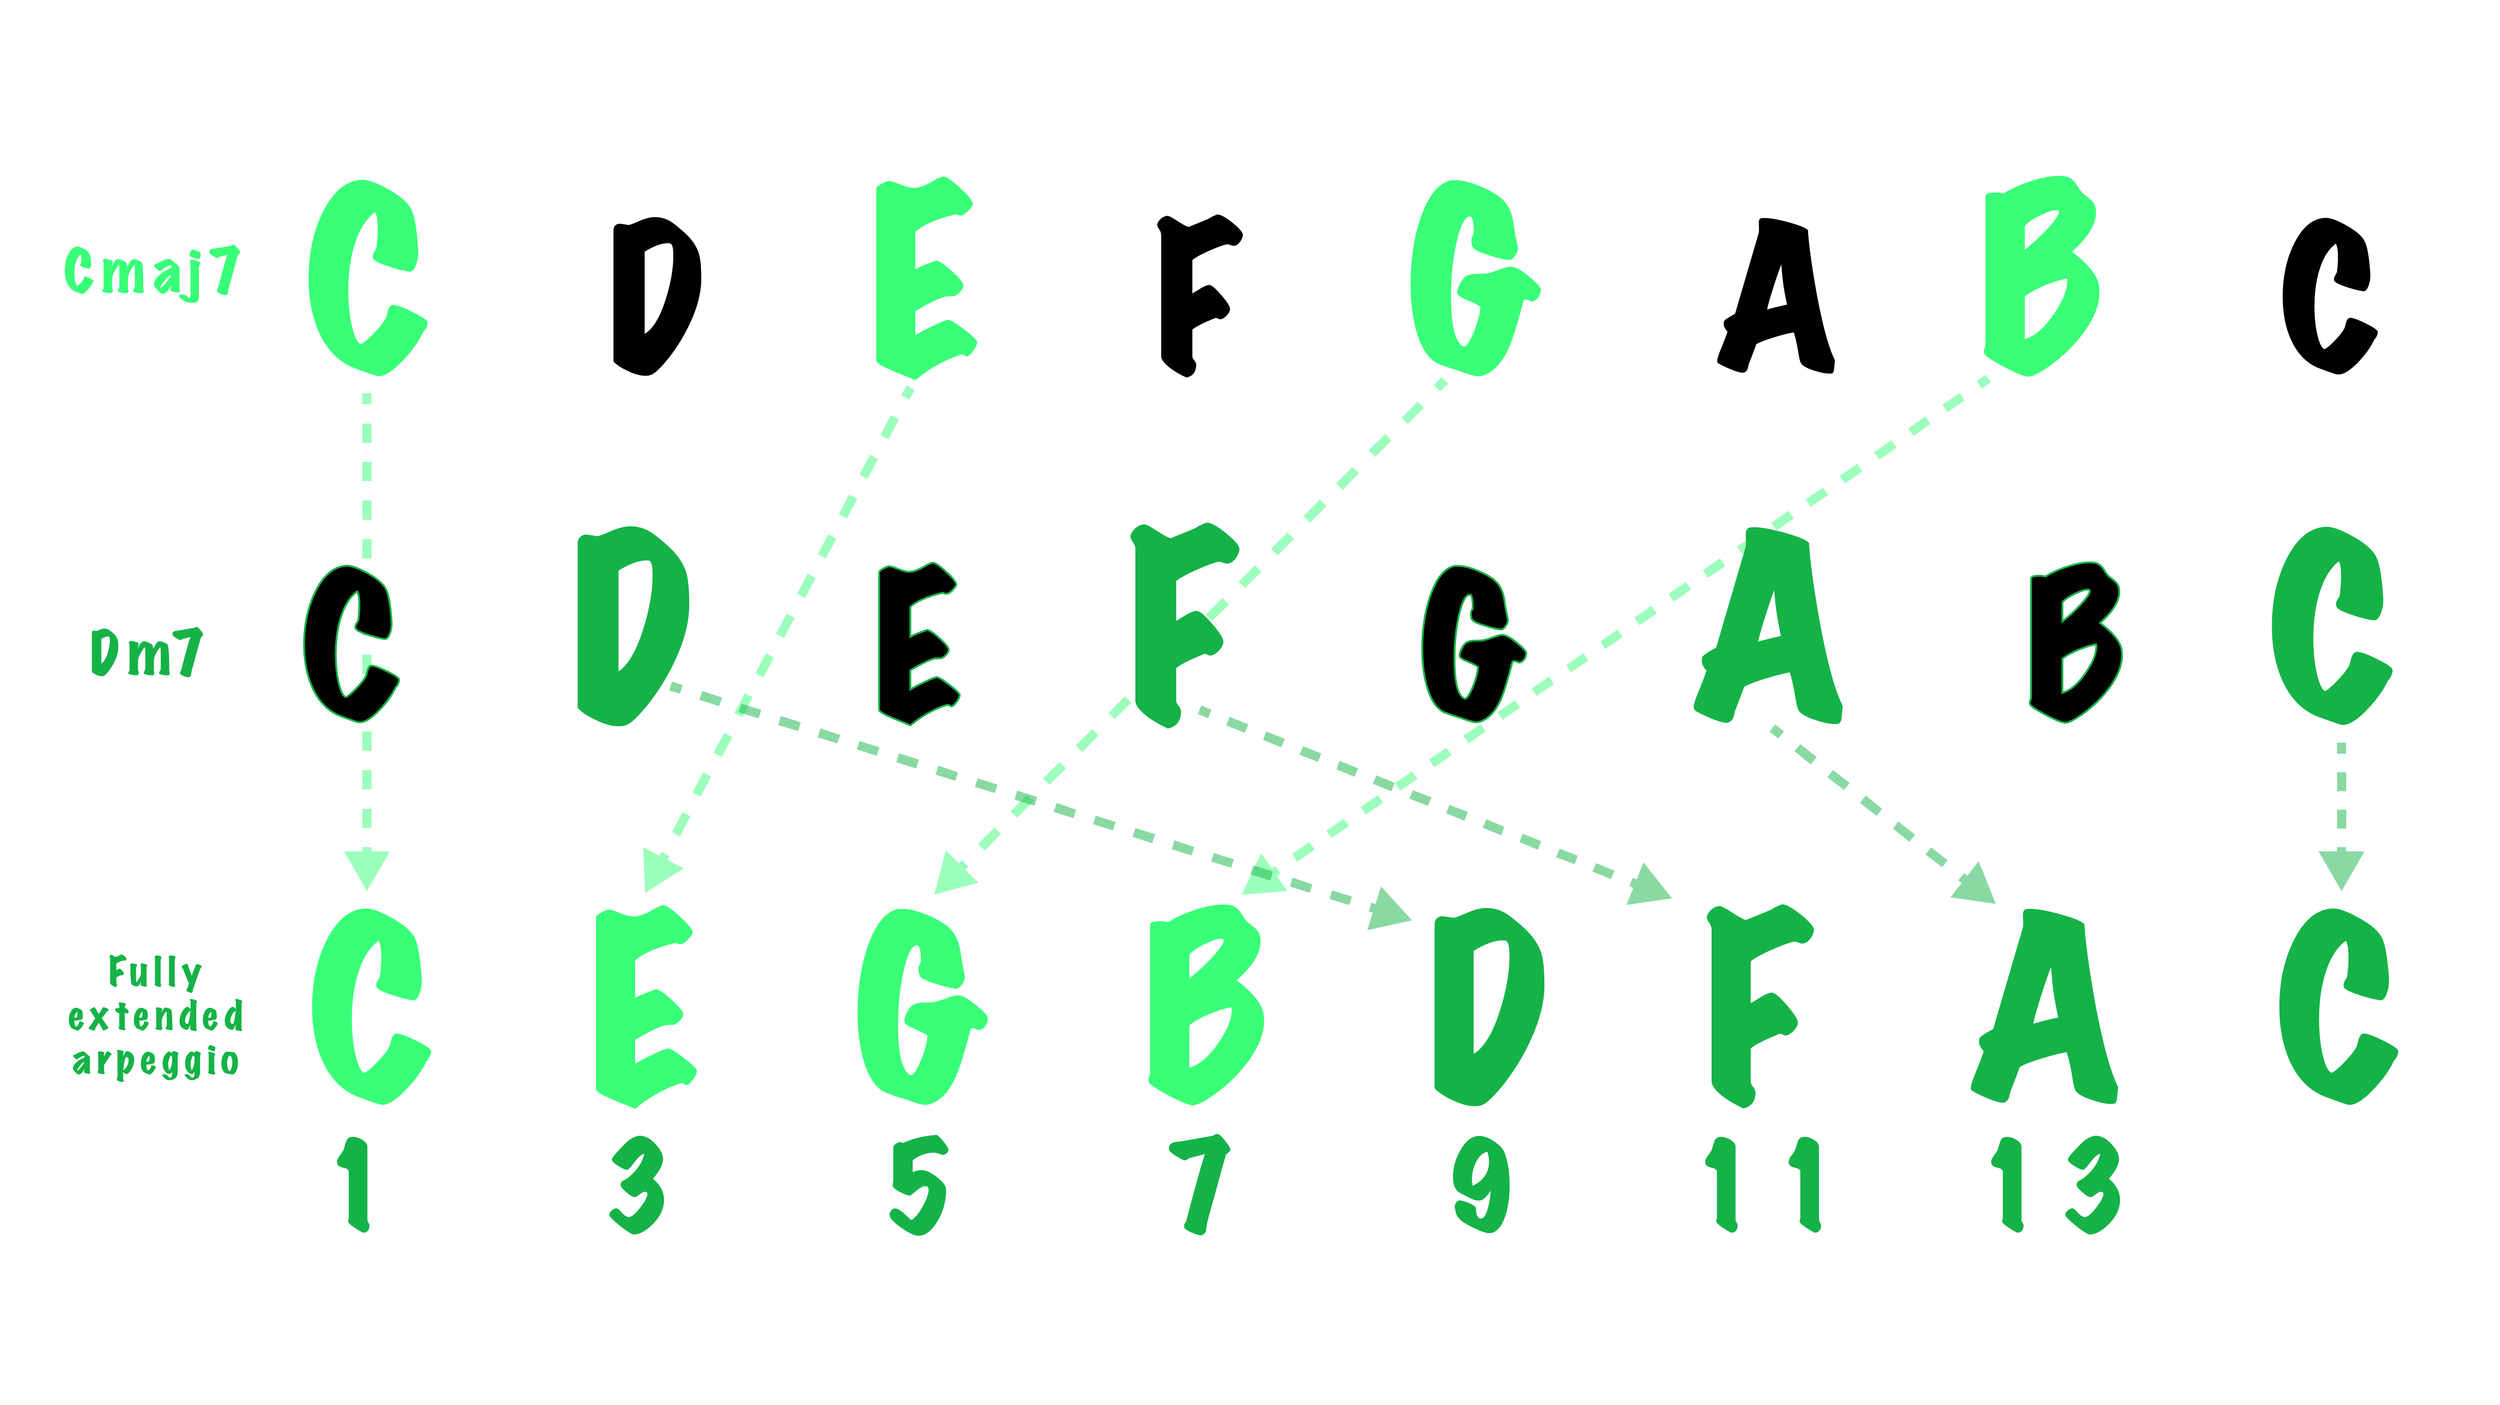
Well, turns out we get the same notes as the fully extended arpeggio if we simply play a seventh arpeggio and stack the next chord in the scale on top of it as another seventh arpeggio.
Fig. 7: Cmaj7 arpeggio with Dm7 arpeggio stacked to created a fully extended arpeggio.
This method develops muscle memory much more quickly and has the added benefit of improving your perception of the notes of the fretboard and their scale degree functions.
It’s easier and it makes you a better musician. That’s a pretty good reason to explore this idea!
How to play seventh chord arpeggios
Here are the left and right expressions of the major seventh arpeggio:
Fig. 8: Major seventh arpeggio - left and right expressions.
Here are the left and right expressions of the minor seventh arpeggio:
Fig. 9: Minor seventh arpeggio - left and right expressions.
Here are the left and right expressions of the dominant seventh arpeggio:
Fig. 10: Dominant seventh arpeggio - left and right expressions
Here are the left and right expressions of the half-diminished (also known as the minor 7 b5) arpeggio:
Fig. 11: Half diminished arpeggio - left and right expressions.
We can apply these shapes all over the fretboard. They might look a little different because of how the B string behaves but we’re not going to let that throw us. If you’re not confident applying different chord shapes and scales to the B string, check out this lesson to learn why the B string is helpful and how to navigate it properly.
How to stack seventh arpeggios for full extensions
Here are the left and right expressions of the fully extended Cmaj7 arpeggio (Cmaj7 + Dm7):
Fig. 12: Right expression of fully extended Cmaj7 arpeggio.
Fig. 13: Left expression of fully extended Cmaj7 arpeggio.
Here are the left and right expressions of the fully extended Dm7 arpeggio (Dm7 + Em7):
Fig. 14: Right expression of fully extended Dm7 arpeggio.
Fig. 15: Left expression of fully extended Dm7 arpeggio.
Here are the left and right expressions of the fully extended Em7 arpeggio (Em7 + Fmaj7):
Fig. 16: Right expression of fully extended Em7 arpeggio.
Fig. 17: Left expression of fully extended Em7 arpeggio.
Here are the left and right expressions of the fully extended Fmaj7 arpeggio (Fmaj7+ G7):
Fig. 18: Right expression of fully extended Fmaj7 arpeggio.
Fig. 19: Left expression of fully extended Fmaj7 arpeggio.
Here are the left and right expressions of the fully extended G7 arpeggio (G7+ Am7):
Fig. 20: Right expression of fully extended G7 arpeggio.
Fig. 21: Left expression of fully extended G7 arpeggio.
Here are the left and right expressions of the fully extended Am7 arpeggio (Am7 + Bm7b5):
Fig. 22: Right expression of fully extended Am7 arpeggio.
Fig. 23: Left expression of fully extended Am7 arpeggio.
Here are the left and right expressions of the fully extended Bm7b5arpeggio (Bm7b5 + Cmaj7):
Fig. 24: Right expression of fully extended Bm7b5 arpeggio.
Fig. 25: Left expression of fully extended Bm7b5 arpeggio.
This is not an exhaustive list, but they are the main ones you’ll come across using this principle. The examples above demonstrate the arpeggio shapes starting on the Low E string. Use your knowledge of how the B string behaves to apply these shapes across other string sets.
As you’re playing these arpeggios, make an effort to recognise the notes on the fretboard in both arpeggios and their respective scale degrees. This is a fantastic way to improve your knowledge of the notes on the fretboard and your understanding of harmony and chord behaviour at the same time.
Don’t worry about root notes
Try and avoid relying too much on root notes. I think one of the worst things that less experienced guitar players do is get caught up on root notes. The root note is of no more importance than the 3rd, the 5th, or the 7th scale degrees. It just has a different role in the chord.
If you really want to level up your playing and increase the usefulness of these arpeggio shapes, practice them using inversions. That is, starting from a note other than the root.
Inversions don’t have to be scary. We just have to visualise the fragment of the left or right expression that occurs above the main arpeggio shape.
Fig. 26: Visualising the fragment of the right expression of the E major scale that occurs below the left expression when we start it on the A string.


